
We all know that it is sometimes not so easy to choose the right signal isolator or signal converter to help solve important ground loop and signal conversion challenges as a lot of selection will depend on how much we understand the application. For example, we need to consider if the connecting instrument runs on 4-wire (mains-powered) or 2-wire (loop-powered).
The type of PLC/DCS input card should be considered as well since an output loop-powered isolator can be powered from an active input card. With a new emerging method of converting signal digitally, we have to also consider if the selected signal converter is able to accept HART data.
 In this article, I’ll share with you a wide variety of tips of using our latest signal isolator, MACX MCR-SL-RPSS-I (see picture on the left), covering things such as the connection flexibility, usability guidelines and etc…
I hope you enjoy reading it.
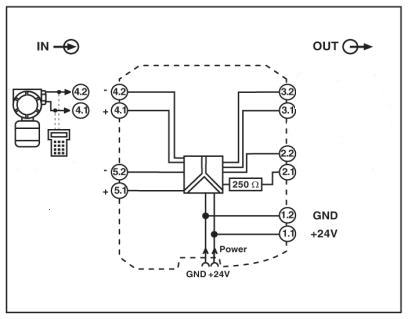
1. How to connect the MACX MCR-SL-RPSS-I to a 2-wire transmitter?
Simply connect to terminal 4.1 (+) and 4.2 (-) as per the diagram shown below.
2. How to connect the MACX MCR-SL-RPSS-I to a 4-wire transmitter?
Simply connect to terminal 5.1 (+) and 5.2 (-) as per the diagram shown below.

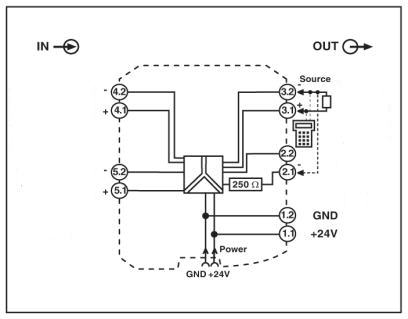
3. How to connect the MACX MCR-SL-RPSS-I to an active input card (with a built in 250 Ohm resistor)?
Simply connect to terminal 3.2 (+) and 2.2 (-) as per the diagram shown below.
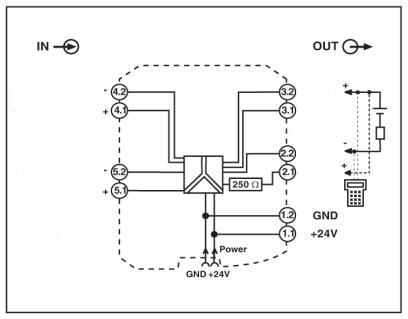
4. How to connect the MACX MCR-SL-RPSS-I to a passive input card (with a built in 250 Ohm resistor)?
Simply connect to terminal 3.1 (+) and 3.2 (-) as per the diagram shown below.
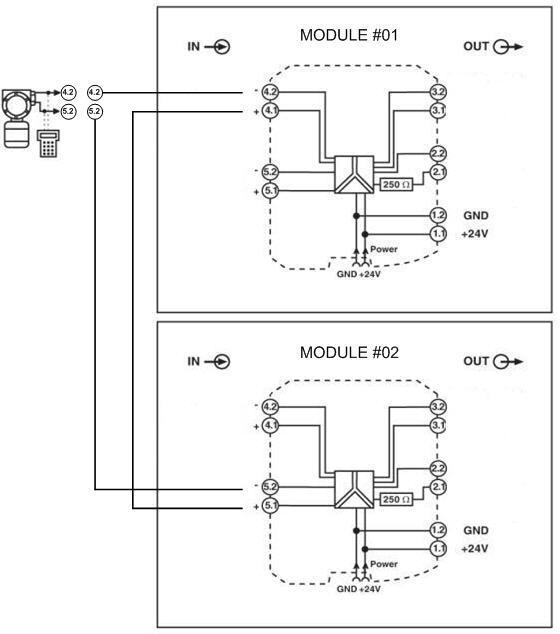
5. How to duplicate the incoming signal to 2 separate input cards without having to buy a different signal isolator?
There are two ways in handling this but my preferred solution will be as follow:
a. Put 2 units of MACX MCR-SL-RPSS-I side by side and let’s name them module #01 and #02.
b. On the input side, connect both input terminal 4.1(+) of module #01 and 5.1(+) of module #02 together.
c. Next, connect the 2-wire transmitter to terminal 4.2 (-) of module #01 and 5.2 (-) of module #02 as per the diagram shown below.
d. It’s DONE! Module #01 is now working as a repeater power supply while module #02 is functioning as a signal isolator.
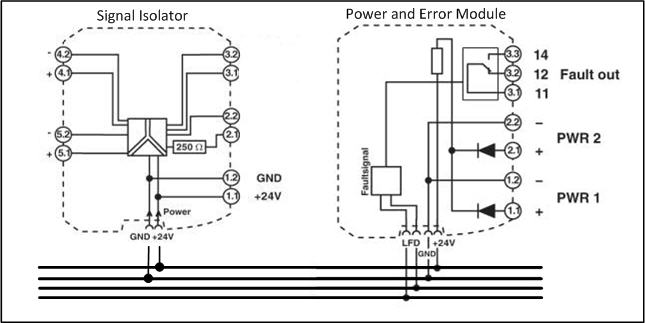
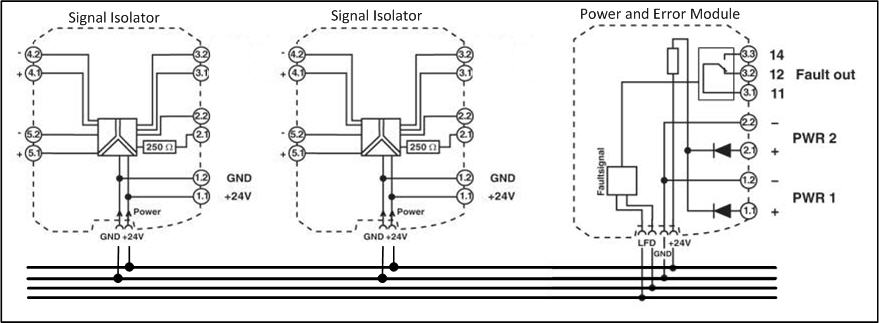
6. How to increase installation time with limited resources?
Simply use a DIN rail connector ME 6,2 TBUS from Phoenix Contact, snap it in the DIN rail and this allows bridging of voltage supply as the diagram shown below.

If the total current consumption of connected modules does not exceed 400mA, the power can be fed in directly at the connecting terminal blocks (1.1 & 1.2). Else a Power and Error Message module, MACX MCR-PTB can be used to feel in the supply voltage to the DIN rail connector.
very useful.. like it
Pingback: Fenton Glass